Once you load up Roblox Studio, click on the Part icon. If you don't see this icon, make sure you are on the Home tab. Next, we're going to make the part actually look like a kill brick. To do this, modify the following properties:
- Change the Name property to KillBrick
- Change the Material property to Neon
- Change the BrickColor property to Red
- Change the CanCollide property to false (uncheck the box; this will turn off collisions)
- Change the Anchored property to true (this will prevent the kill brick from falling or moving around)
- Change the Size property to 10, 1, 1
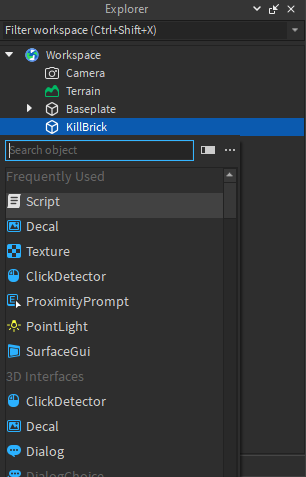
We've now created a kill brick, but it won't work just yet as we haven't scripted it. Right click on the kill brick in the Explorer (if you don't have the Explorer open, click on the View tab and click Explorer). Click on Insert Object and insert a Script (make sure it is a regular script, not a local script or module script).

You can delete the existing code inside of the script. The first thing we have to do is make a variable for the kill brick object. The script is inside of the kill brick (if it's not, make sure you move the script inside of the kill brick), meaning that the Parent property of the script is equal to the kill brick. We can reference the kill brick using the following code:
local killBrick = script.ParentNow that we've referenced the kill brick in our code, we now need to write code so that the kill brick will kill any player that touches it. To do this, we will use the Touched event which fires whenever something touches an object. Anything can touch the kill brick though, and in our case we want to make sure that what touched the kill brick was actually a player.
local killBrick = script.ParentkillBrick.Touched:Connect(function(hit) local player = game.Players:GetPlayerFromCharacter(hit.Parent)end)The hit variable is a parameter of the Touched event, and it represents what touched the kill brick. Anything can touch the kill brick, whether it be another object or a player. When a player touches it, the hit variable will be equal to the part of the player that collided with the kill brick, such as the player's arm or leg.
To check if what touched the kill brick was a player, we use the GetPlayerFromCharacter function, which just like it sounds, gets the player object using their character. The player's character is the Parent of the parts of the player such as the player's arms and legs, so hit.Parent is equal to the player's character. The GetPlayerFromCharacter function then gets the player object using the character and sets the player variable to the player object if it is found.
The next step is to set the player's health to zero if the player object exists. The player's health points are set inside of the Humanoid object which is located inside of the player's character.
local killBrick = script.ParentkillBrick.Touched:Connect(function(hit) local player = game.Players:GetPlayerFromCharacter(hit.Parent) if player then player.Character.Humanoid.Health = 0 endend)If you now playtest your game and walk over the kill brick, it should kill your player. And that is how you make a kill brick in Roblox Studio!
